To create a new advanced form, choose Add and then Advanced Form from the Forms Management screen. To work with an existing advanced form, double-click it or choose its Edit icon from the Action column.
The Forms Designer opens when you choose any advanced form. The choices you make in the Form Designer determine what displays on the handset. Use the Form Designer Tools to work with the data you enter.
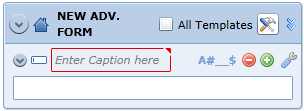
Below is a new, untitled advanced form.
1. Type a name for the form in the Name field up at the top of the Advanced Form screen. Device users will see this name in the forms list. If you create multiple forms, enter a descriptive name that will easily identify the form.
2. Choose the All Templates checkbox if all the fields you are creating will be template fields. Template fields contain data that users re-enter in forms, such as employee number or vehicle number.
3. Click <Enter Caption here> and enter a caption for the first field.
Every form, sub-form, repeatable form and expandable form must have a title and a caption. The title displays in bold on the form header, and the caption displays on the device. The form title helps you to navigate through your advanced form in the Forms Designer, especially when all forms are completely collapsed.
4. Click Field Properties ![]() and choose a property for the field. See Field Properties for a complete listing of properties.
and choose a property for the field. See Field Properties for a complete listing of properties.
5. Use Add Field ![]() to continue to add fields and set field properties, using the options below as you create:
to continue to add fields and set field properties, using the options below as you create:
Additional Form Actions ![]() to duplicate any form you have created
to duplicate any form you have created
Expand/Collapse for a single field/all fields ![]() or all field names
or all field names ![]() for easy viewing
for easy viewing
Field Order arrows to rearrange the order of field choices ![]()
Add ![]() and Delete
and Delete ![]() next to your entries to add or delete field choices
next to your entries to add or delete field choices
Sub-forms and Decision Groups are based on decisions or other form data. They are connected to the main form by a double-headed arrow stemming from a Decision Indicator ![]() that will display after you have added choices for the device user to select from. You can also create Expandable Forms, which allow you to make additional form choices available without extending the length of the form on the device's screen.
that will display after you have added choices for the device user to select from. You can also create Expandable Forms, which allow you to make additional form choices available without extending the length of the form on the device's screen.
6. To add subforms, click the Decision Indicator. A double-headed arrow displays.
7. Enter the title, caption and then fields and properties for the new sub-form.
8. Continue to create form types and fields until you have finished replicating your workflow or paper form.
You can always return and change data by clicking within any field and retyping text, and/or clicking the Field Properties icon to change its properties. See Advanced Forms for a sample of a completed advanced form. Repeatable forms allow the user to enter multiples of the same type of information, such as parts used on a service call.
Working in the Forms Designer Area
You can move the form boxes around the Forms Designer area to maximize space as your form expands. To move the form boxes around, click and hold the top border of a form box. The connecting arrows will adjust accordingly.
Or to adjust the resolution of the form display area, drag the view slider up or down at the bottom right. You can also click on a connector arrow and choose the Delete icon that displays to break a connection between form and a sub-form.
9. Click Lock ![]() to prevent the form from being updated by another user. Enter a password and confirm the action. You must re-enter your password to unlock the form for modifications.
to prevent the form from being updated by another user. Enter a password and confirm the action. You must re-enter your password to unlock the form for modifications.
10. When you are finished, choose Save ![]() and save the form to the server or to your local file. If you save the form to a local file, you will be prompted to navigate to a location on your hard drive. The form is automatically published to the device when you save it to the server.
and save the form to the server or to your local file. If you save the form to a local file, you will be prompted to navigate to a location on your hard drive. The form is automatically published to the device when you save it to the server.
Related Topics